Beyond the sheer fun of it, building your own drone gives you unparalleled control over its capabilities, allows for easy repairs, and provides a deep understanding of how these amazing machines work. Plus, the satisfaction of seeing something you've put together take flight is truly unbeatable.
For this build, we'll be focusing on a classic setup that offers a great balance of performance and ease of assembly. We're talking about the versatile Pixhawk flight controller, paired with a robust F450 frame, efficient motors, and capable ESCs.
The Heart of Our Drone: The Components
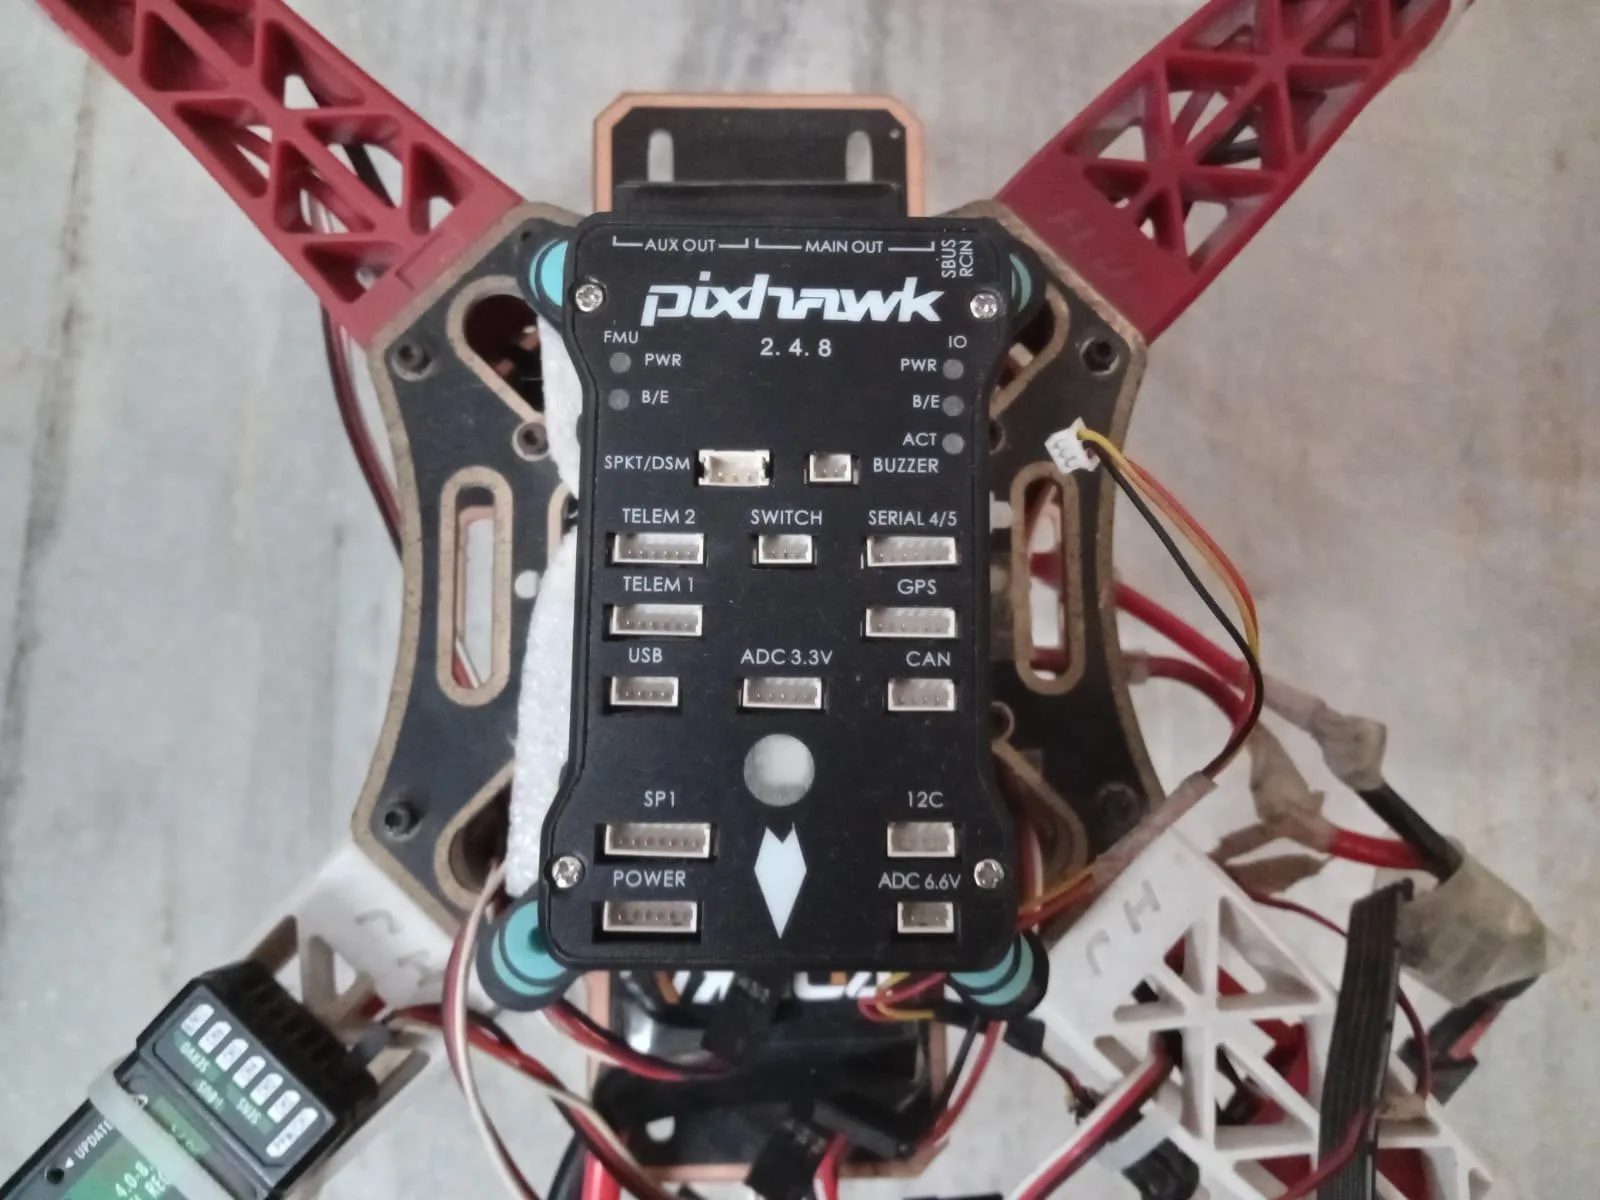
- Pixhawk 2.4.8 Flight Controller (PX4 32Bit FC): This powerful, open-hardware flight controller runs the ArduPilot firmware (or PX4), providing advanced capabilities, robust performance, and excellent stability. It's a significant upgrade from older "ArduCopter" boards like the APM, offering more processing power and memory for complex features.
- F450 Frame: A popular, lightweight, and durable quadcopter frame that's ideal for beginners and experienced builders alike. Its symmetrical design makes assembly straightforward.
- 1000kv Brushless DC Motors (x4): These motors are a fantastic choice for an F450. The "kv" rating (RPM per volt) indicates their speed. 1000kv is a good all-rounder, providing a balance of thrust and efficiency for this setup.
- 30A ESCs (Electronic Speed Controllers) (x4): ESCs are crucial as they convert the signals from the flight controller into electrical power to spin the motors. A 30A rating ensures they can handle the current drawn by our 1000kv motors.
- LiPo Battery: Lithium Polymer batteries are the powerhouses of drones. The specific voltage and capacity (e.g., 3S 2200mAh or 4S 3000mAh) will depend on your desired flight time and power, but generally, a 3S or 4S pack is suitable for this build.
- Propellers (e.g., 8-inch or 10-inch): Matched to your motors and battery for optimal thrust.
- Power Distribution Board (PDB): Simplifies wiring by distributing power from the battery to all ESCs.
- Radio Transmitter and Receiver (FlySky FS-i6): Your way to control the drone!
- Optional: GPS Module, Safety Switch, Buzzer: Pixhawk systems often benefit greatly from a dedicated GPS module for advanced flight modes, and typically require a safety switch and buzzer for safe operation and status indicators.
- Basic tools: Soldering iron, heat shrink tubing, zip ties, screwdrivers, etc.
Let's Get Building! The Assembly Process
Here’s a detailed schematic and the steps to put it all together. Take your time, be patient, and double-check everything!
Detailed Schematic Overview:
Imagine a central hub (your Power Distribution Board) where the battery connects. From this hub, power lines branch out to each of your four ESCs. Each ESC then connects directly to one of your four motors. The Pixhawk flight controller sits above all this, sending control signals to each of the ESCs. Your radio receiver will plug into the Pixhawk, telling it what you want the drone to do. A GPS module, if used, will also connect to the Pixhawk, providing crucial data for position hold and autonomous flights.
Step-by-Step Assembly:
- Frame Assembly:
- Begin by assembling your F450 frame according to its instructions. This usually involves attaching the arms to the main body plates. Ensure all screws are tight but avoid overtightening.
- Motor Mounting:
- Attach the 1000kv motors to the ends of the F450 frame arms using the provided screws. Make sure they are secure and oriented correctly (usually with the wires facing inwards).
- ESC Placement and Wiring:
- Mount the 30A ESCs onto the arms of the frame, close to their respective motors. You can use zip ties or double-sided tape.
- Solder the three motor wires from each motor to the three output wires of its corresponding ESC. It doesn't matter which motor wire goes to which ESC wire initially for brushless motors – if the motor spins the wrong way later, you can swap any two wires.
- Solder the power input wires (red and black) from each ESC to the positive and negative pads on your Power Distribution Board (PDB). Ensure correct polarity!
- Power Distribution Board (PDB) to Battery:
- Solder a battery connector (e.g., XT60) to the main power input pads of the PDB. Again, double-check polarity. This is where your LiPo battery will connect.
- Pixhawk Flight Controller Mounting and Wiring:
- Mount your Pixhawk board to the center of the frame, typically on vibration-damping standoffs or foam. Proper vibration isolation is key for good flight performance.
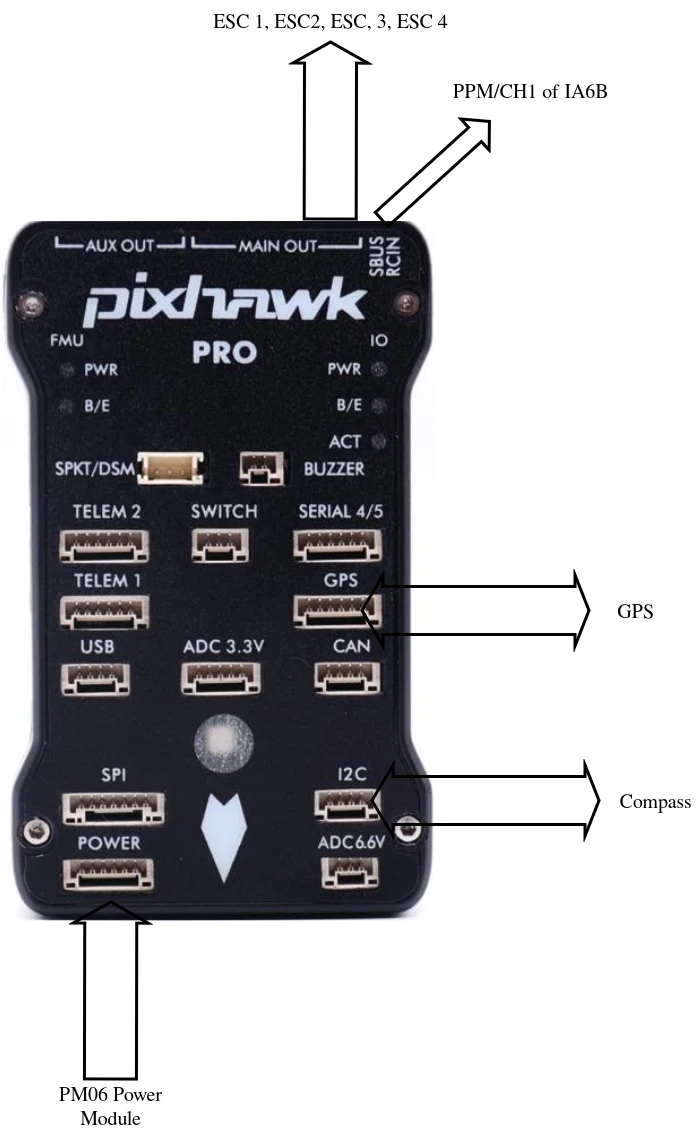
- Connect the signal wires from each ESC to the appropriate "MAIN OUT" or "PWM OUT" pins on the Pixhawk board (e.g., M1, M2, M3, M4 for a quadcopter). Refer to your specific Pixhawk model's documentation for the correct pinout.
- Connect your radio receiver to the designated "RCIN" or "SBUS/DSM" input pin on the Pixhawk. This will typically be a single cable for modern receivers (e.g., SBUS, PPM, DSMX). It is really important to know if your RC supports PPM (Pulse Position Modulation) or not. We are using Flysky FS-i6 with Flysky IA6B as receiver.
- Ch1/PPM of IA6B is used for SBus which you can connect with RCIN of PX4.
- If you have a GPS module, connect it to the dedicated "GPS" port on the Pixhawk. Often, GPS modules also integrate a compass, which connects to the "I2C" port.
- Connect the required safety switch and buzzer to their respective ports on the Pixhawk. These are essential for proper Pixhawk operation.
- Connect any other peripherals like telemetry modules or power modules to the Pixhawk as per your setup's requirements.
- Initial Power Up (without propellers!):
- Before attaching propellers, connect your LiPo battery. Listen for the ESC and Pixhawk beeps and LED sequences, which provide status indicators.
- Connect your Pixhawk to your computer and use the Mission Planner (or QGroundControl) software to perform initial setup, calibrate ESCs (if needed, many modern ESCs auto-calibrate with Pixhawk), calibrate accelerometers, magnetometers (compass), and set up your radio and flight modes. This step is critical!
- Propeller Attachment:
- Once all calibrations are done and you are confident in your setup, attach the propellers. Ensure propellers are installed with the correct rotation direction for each motor. Counter-rotating propellers are essential for stable flight. Always be extremely cautious when propellers are attached.
First Flight and Beyond
Find an open, safe area for your first flight. Start slowly, getting a feel for the controls. Remember, practice makes perfect! As you get more comfortable, you can explore Pixhawk's advanced features like GPS position hold, autonomous mission planning, Return-to-Launch (RTL), and much more.
Building a drone is a fantastic entry point into the world of electronics, coding, and aeronautics. It's a journey of learning, problem-solving, and immense satisfaction.
Got stuck? Have questions about your build, or need some technical advice? Don't hesitate to reach out! We're here to help you get your drone off the ground. Whatsapp